Saturday, July 20, 2013

Chocolate Cherry Birthday Cake with Whipped Buttercream Icing by Brittany Kilpatrick

Each year for my birthday my sweet hubs asks what kind of cake I want for my birthday. About 99% of the time I ask for this bomb-digity Chocolate Cherry Cake. It's super simple to make and tastes incredible! This year I when I asked Mike (my husband) what kind of cake he wanted for his birthday I was thrilled to find out he wanted this one! One difference between the two of us is that I like dark chocolate frosting while he thinks white buttercream is sweet enough for his taste.


Chocolate Cherry Birthday Cake


Ingredients
- Box of chocolate cake mix (follow instructions on box, this particular box mix calls for eggs, water, oil)
- 3 eggs
- 1/3 cup vegetable oil
- 1 cup water
- 1 21oz can of cherry pie filling


Directions:
1. Pre-heat oven to 350 degrees and grease two 9 inch round pans
2. Mix together your chocolate cake mix, eggs, water and oil. *ingredients may vary depending on which box mix you use*
3. Add the entire can of cherry pie filling.
 
4. Mix this by hand and NOT with the blender. You want your cherry chunks to remain chunky.
5. Add mixture equally between the two cake pans.
 
6. Bake for the allotted time on the box mix (approximately 25-30 minutes).

Whipped Buttercream Icing

This icing is not super sweet. It has just enough sweet in my opinion to compliment the cake. If you make this and decide you want it sweeter, add more powdered sugar 1/4 cup at a time.

Ingredients
- 1 cup of butter (2 sticks)
- 1 teaspoon vanilla extract
- 1 cup powdered sugar


Directions:
1. Combine all ingredients in a mixer or you can use a hand mixer.
 
2. This is the important one: Mix the sh*t out of the icing! Put the mixer on high for about 30 seconds or more. You will know it is ready when it is whippy and light. It it still feels heavy and yellowish whip it longer.

Allow your cake to cool then using whatever icing skills you have, throw that icing on!

Blow out those candles and enjoy flavor!


**********
 
Happy Birthday Mike!!!! We love you.
 
xoxoxoxox
Jen and Brett
 
 
If you make this cake please post the photos for us to see.  
 

Saturday, July 6, 2013

4th of July Vegetarian Menu for 2

Alicia and Ben celebrated their 4th in the Bahamas. The cashew cream delights look mind blowing! This is a simple and lite menu that would be perfect for a mellow get together. Enjoy.

4th of July Vegetarian Menu for 2

Flatbread Veggie Sammies
Mediterranean Barley Salad
Cashew “Cream” Delights


Tips Before Starting:

*Make Cashew Cream Delights earlier in the day
*Start making Flatbread dough and marinate mushrooms about 1 ½ hrs before grilling starts

Flatbread Veggie Sammies

Ingredients:
2 Whole Large Portobello Mushroom caps (marinate in olive oil and crushed garlic for at least one hour)
1 Zucchini cut into 1/8in. slices (length-wise) and brushed with olive oil
Flatbread (or buns/bread of choice; we prefer to make our own bread and used this delicious and easy recipe HERE )
2 handfuls of fresh spinach leaves
Sea Salt to taste


Feta Sauce for sammies:
½ cup feta cheese
¼ cup Greek yogurt (or full fat sour cream)
1 tsp lemon zest
1 TBSP lemon juice
Chopped basil leaves


Directions:
  1. Make your feta sauce first and keep in fridge.
  2. Grill veggies after all other menu items are complete is done. Turn the zucchini on each side for about 2 minutes. Put the mushroom caps on top side down for 10-12 mins. You can flip the caps if you’d like, but then you lose all the delicious juice. Grill these with grill top down or covering caps with a large saucepot or lid.
  3.  If making the above fresh flatbread, grill these next after you’ve brushed one side with olive oil.   If you have a thermometer on your grill, we recommend 400 degrees- enough to cook the inside without charring the outside.
  4. Layer: Flatbread, spoonful of feta sauce, spinach, zucchini, mushroom cap, more feta sauce!)

Mediterranean Barley Salad Supreme

Ingredients:
1 cup cookd barely grains
½ pint of cherry or grape tomatoes
Avocado slices
½ cup chickpeas
¼ can artichoke hearts
Sunflower seeds for crunch
Mixed Greens
Olive Oil
Sea Salt
 Lemon juice 


Directions:
  1. Cook and cool barley grains. We pre-soaked and cooked hull-less barley. Soaking is very important to help eliminate the phytic acid in the barley which impedes proper digestion and mineral absorption. This takes several days and should be done in advance. You can use the remaining barley for soups, as a risotto, or rice like side dish another time.
  2. Clean and add mixed greens in a bowl.
  3. Wash and slice  ½ pint of cherry or grape tomatoes.
  4. Slice avocados
  5. Add ½ cup chickpeas (Pre-soaked, cooked, and cooled dried peas are better for texture and taste; we used the remaining for several batches of savoury hummus!).
  6. Drain and add ¼ can artichoke hearts.
  7. Sprinkle Sunflower seeds for crunch.
  8. Toss with quick dressing (see below)

Quick dressing

Ingredients: Olive Oil, Sea Salt, and Lemon juice
Directions: Mix all ingredients together.


Cashew Cream Delights

Ingredients:
“Cream”
1 cup Raw Cashews (soak the night before in filtered water)
1 TBSP honey or agave
1 tsp pure vanilla extract
¼-1/2 cup filtered water
Process all ingredients in food processer or high speed blender until smooth and creamy. Store in fridge.
Crust
1 cup Raw Almonds
1 TBSP coconut oil
1 tsp cocoa powder
Pinch of salt
2 dates (vegan) or 1 TBSP honey (vegetarian)

Directions:
  1. Process Almonds alone in food processer until it looks like flour with small chunks (be careful not to process too long or it will mix and become butter!)
  2. Then process all ingredients until thoroughly mixed. Will be slightly wet but sticking together.
  3.  
  4. Press into muffin or cookie tin (bottom and sides) and put in freezer.
     

Toppings:
*(make coulis with first 3 ingredients by combing them in a small saucepot and bringing to a boil, blending and then cooling in fridge)
½ cup fresh or frozen strawberries
1TBSP lemon juice
1 TBPS raw sugar
Small handful of blueberries
Assembly:
 15 mins. before serving, take crust cups out of freezer and use knive to remove.
Spoon “cream” into cups and add coulis and blueberries.

Happy 4th of July!!

If you decide to make any of the above please post them below or send them to Jennifer to post. 

Thank you, Belicia!! xo

Monday, July 1, 2013

Peanut Butter Chocolate Chip Banana Ice Cream

Do you ever wonder what you should do with your ripe bananas? I usually make banana bread but wanted to change it up this time around. While searching around I found a two ingredient banana peanut butter ice cream recipe and decided to add the chocolate chips for this post. I was shocked at how creamy, and tasty this turned out. The consistency matches ice cream (make sure you get your banana slices REALLY frozen or you will end up with soft serve).

Ingredients:

2 bananas
1//3 cup mini chocolate chips
1/4 cup of peanut butter


Directions:

1. Defrost bananas (skip this step if you haven't been saving bananas in your refrigerator). Do not let them thaw all of the way, just enough so that the skin comes off.

2. Peel the bananas and slice them up. Then put them on a plate that will fit in your freezer.
3. Put the plate in your freezer and let them freeze for 2 hours. Make sure that the bananas are VERY frozen before moving forward.
4. Put all of the frozen bananas in your blender or food processor.
5. Add the peanut butter.
6. Blend the bananas. It will take a lot of processing/blending before the bananas become creamy.
7. Once the bananas are creamy, add the chocolate chips.
8. Scoop out and enjoy!


Lillie loved making this recipe :)


If you decide to make this recipe, please send me a photo!

To subscribe to this blog email jenapatrick@yahoo.com

Friday, June 14, 2013

The Green Machine

The past recipes on this blog have been very good but their health benefits are questionable. This recipe makes up for all of that. Brett and I have been juicing every morning for the past two weeks and can feel the difference. Not only weight loss, but we have more energy.  The below concoction has always been one of my favorites. Enjoy!


The Green Machine


 Ingredients: 
10 Granny Smith Apples
1 Ginger root (this can get really spicy so start small and add more if you want)
1lb of Spinach
3 Lemons


Directions:
I like to prepare everything before I start juicing them.

1. Remove the stems from all apples and wash them.

 2. Peel the rinds off of all the lemons.
3. Wash the spinach.
4. Fire up your juicer.
5. Put 2 apples through the juicer.
6. Then juice 1 lemon.
7. Then grab a handful of Spinach and put it in the juicer.
8. After that juice the ginger root.
9. Add the full glass to a container. I prefer to put my container in the sink with a funnel so that it cuts down on the mess.
10. Repeat 5-8 until all of the apples, lemons, and spinach are gone (the ginger was in the first round).
11. Combine all of the juice in the container and shake really good so all of the flavors get mixed together.
There you have it! The Green Machine.


Did you know that....


Raw Lemon Juice: This ball of yellow love is a great antioxidant and has anti-cancer effects on the system. It is rich in Vitamin C and very beneficial in maintaining a functional immune system, and aiding in digestion. Lemon juice also is good for helping prevent heart failure and cleaning your blood. Then there is the ever-present scurvy cure for which the lemon is most famous. For a full article on raw lemon juice that lists more health benefits and interesting facts about the lemon  CLICK HERE

Raw Spinach Juice: Spinach juice is high in vitamin A and C and is one of the few vegetables that is also high in vitamin E. It is an amazing source of protein and has 14 times the amount of iron in it per calorie then red meat. These green leaves also boast healing powers for cataracts, inflammation, skin complexion, healing, and reduces the risk of cancer. For more information on the health benefits of Spinach CLICK HERE
Raw Green Apple Juice: Green apples are very rich in fibers needed for digestion. They can also reduce your risk for colon cancer and are very low in cholesterol. The green apple is full of vitamin A, B, C, and E. It is also a great agent in cleaning your liver.
Raw Ginger Juice: Ginger helps prevent flatulence (yes), nausea, vomiting, motion sickness and helps improve Osteoarthritis. It is also a good source of Vitamin C, potassium, manganese, and copper. To read more about Ginger CLICK HERE

 All of these health benefits in one little jar of green. Cheers!


Please send me photos of your Green Machines! Sometimes I add broccoli for that extra little kick but really you can add what ever green you like.

If you are interested in sharing a recipe please take photos (follow the format of my blogs) and send me the recipe and I will post it.


Wednesday, May 29, 2013

CRACK by Jess Trujillo

Jess brings in this recipe and it is gone in two shakes of a lambs tail. It's a delicious but odd combination of items. I never would have thought saltines could turn into the most loved recipe at Taschen but it most definitely is.

Crack

Ingredients:
Saltine Crackers (40 per pan)
2 sticks of butter
1 cup of golden or light brown sugar
11.5 ounces milk chocolate chips
Rainbow sprinkles


Directions:

Preheat oven to 350

Find a cookie sheet that will hold a grid of exactly 5x8 saltine crackers. This is the most important thing - if you have less than this your crack with be gummy if you have more than this it will spread too thin and burn and your kitchen will smell awful, really awful. 

Line the cookie sheet with foil and spray the foil with Pam or other cooking spray. 

Place saltine crackers in the 5x8 grid. 


 Boil the butter and brown sugar in a small saucepan. The mixture should be foamy and frothy.


Pour the mixture evenly on top of the crackers.
Bake in oven for 12 minutes. 

Remove pan from oven and cover evenly in chocolate chips. Don't put it back in the oven! I did this once and started a fire. And my kitchen smelled awful. 

Let the chocolate chips get melty on the crackers. Use the back of a spatula or something flat to spread the melting chocolate evenly over the pan. 
 Before the chocolate hardens cover everything in sprinkles! You can substitute pretty much anything for the sprinkles like chopped pecans or peppermint or anything that will get stuck in melting chocolate. 

Place pan in refrigerator overnight to harden. 

Peel the crack off the tin foil and break into small pieces. 

Enjoy!
Jess, thank you for the beautiful photos and amazing recipe!

Please send me photos of your CRACK!

Tuesday, May 21, 2013

Mothers Day Ravioli

I haven't spent Mothers Day with my Mom in six years. She came into town and I put her to work on some ravioli. When Alicia was in town, she mentioned she had made homemade ricotta. The idea sounded amazing and simple. With this in mind, my mom and I decided to tackle making our first ever ricotta cheese (or any cheese for that matter). We added the ricotta with a spinach garlic mixture and then decided that one flavor was not enough. That was when the butternut squash ravioli was born. Below is the recipe for homemade pasta, spinach filling, butternut squash filling, and a cream sauce that will blow your mind. Please send me the photos if you tackle this recipe.

Enjoy and Happy Mothers Day!


Butternut Squash Filling:

I am going to start with this because it takes the most amount of time due to the roasting.

Ingredients
Butternut Squash
Sea salt
Olive oil


Directions
1. Preheat oven to 450 degrees.
2.With a peeler, peel the squash and lightly cover it in olive oil.
3. Then with a knife poke the squash all over.
4. Wrap the squash in foil.
5. Bake the squash for 1hour and 45 minutes or until it is soft all over. The time depends on the size of the squash.
6. Let the squash cool.
7. Take out the seeds and stringy middle.
8. Puree squash adding a tsp of sea salt.


Set the squash aside and get ready to make ricotta.

Fresh Ricotta Cheese:

Click here to go to the recipe I used to make my  Fresh Ricotta Cheese.

Ingredients
8 cups whole milk
1 teaspoon salt
3 tablespoons fresh lemon juice


Directions
1.Line colander with 4 layers of cheesecloth; set in sink. 
2.Bring milk and salt to simmer in heavy large saucepan over medium-high heat. 
3.Stir in lemon juice.
 4. Let simmer until curds form, 1 to 2 minutes. 


5.Using finely slotted spoon or skimmer, scoop curds from pan and transfer to cheesecloth-lined colander.

 6. Let drain 1 minute (curds will still be a little wet). 
7.Transfer curds to medium bowl. 
 8.Cover and chill until cold, about 3 hours. DO AHEAD: Can be made 2 days ahead. Keep chilled. 


Spinach Filling:

After the ricotta chills you will add some of it to the spinach for the ravioli filling.

Ingredients

1 bunch of fresh spinach
3 cloves of garlic
1/4 cup of white wine
1/2 of a lemon
2 Tblsp olive oil
1 Tblsp sea salt
1 cup of fresh ricotta


Directions:
 

1. Add olive oil to hot saute pan
2. Saute garlic until it is heated
3. Squeeze in lemon and wine
4. Toss in spinach and cook until it is wilted
5.  Cool mixture
6. Puree spinach mixture with ricotta


Pasta/Ravioli Dough

Click here to go to the recipe I used to make the Pasta Dough. This is a great link because it shows how to prepare pasta in many different ways (ravioli, spaghetti, etc).


Ingredients
1 2/3 cups Italian “00” flour (or half Italian “00” flour and half Farina di Semola)
2 medium or large eggs
1 tablespoon olive oil
A pinch of sea salt
 
Directions
1. Sift the flour onto a clean work surface and make a well in the center with your fist.

2. Break the eggs into the well and add the oil and a pinch of salt to the well.

3. Gradually mix the egg mixture into the flour using the fingers of one hand, bringing the ingredients together into a firm dough. If the dough feels too dry, add a few drops of water; if it’s too wet, add a little more flour. (You will soon grow accustomed to how the dough should feel after you’ve made it a few times.)

4. Knead the pasta until smooth, 2 to 5 minutes. Lightly massage it with a hint of olive oil, pop the dough into a plastic food bag, and allow it to rest at room temperature for at least 30 minutes. The pasta will be much more elastic after resting.
 
5. Start to feed the blob of pasta dough through the widest setting of a pasta machine. As the sheet of dough comes out of the machine, fold it into thirds and then feed it through the rollers again, still on the widest setting. Pass the dough through this setting a total of 4 or 5 times. This effectively kneads the dough, ensuring the resulting pasta is silky smooth.


6. Pass the pasta through the machine again, starting at the widest setting and gradually reducing the settings, one pass at a time, until the pasta achieves the required thickness. The pasta sheet will become very long—if you are having trouble keeping the dough from folding onto itself or are making ravioli, cut the sheet of dough in half and feed each half through separately. Generally the second-from-last setting is best for tagliatelle and the last setting is best for ravioli and any other shapes that are to be filled.

7. After the pasta has reached the requisite thickness, hang it over a broom handle or the back of a chair to dry a little—this will make cutting it easier in humid weather, as it will not be so sticky. Or, if you’re in a hurry, you can dust the pasta with a little flour and place it on clean kitchen towels and let it rest for just a short spell.

8. If your dough is still in a single sheet, cut it into two equal portions. Cover one portion with a clean kitchen towel or plastic wrap while you work with the rest of the dough.

9.Spoon small mounds (1 teaspoon approximately) of filling on the dough in even rows, spacing them at 1 1/2-inch intervals.


10.Using a pastry brush, lightly coat the spaces of dough between the mounds with beaten egg.
11.Using a rolling pin, carefully drape the reserved sheet of dough on top of the mounds, pressing down firmly between the pockets of filling to push out any trapped air.

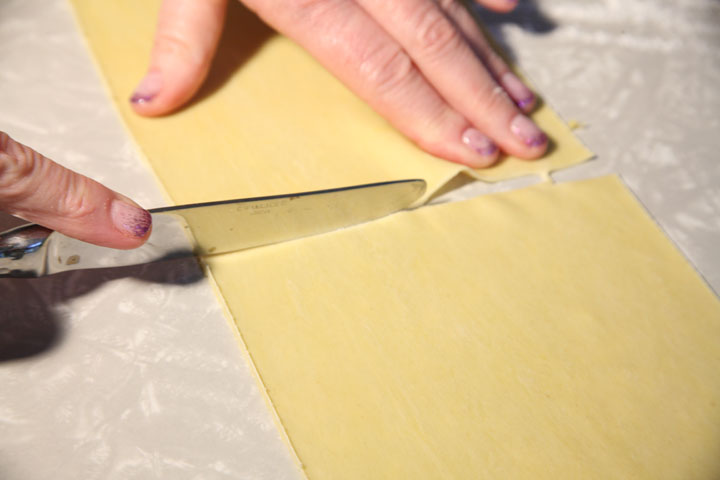
12.Use a serrated ravioli or pastry cutter or a sharp knife to cut the ravioli into squares. Transfer to a floured kitchen towel to rest for 1 hour before cooking.


 Mothers Cream Sauce

Ingredients

1 cup butter
3 cups half and half
1 Tbls
1 cup grated parmesan
1/4 cup 00 flour


Direction
1. Melt the butter in a sauce pan.
2. Add the salt and flour.
3. Stir until thick and bubbly.
4.Whisk in the half and half.

5. Cook until it thickens over a low heat.
6. Add the parmesan.


Pour over ravioli. This was worth the work. I wish I had made more pasta dough so I could have frozen more for later.


 Butternut Squash Ravioli


Spinach Ravioli